Powered by Blogger.

No-Baggage Travel

A friend requested this write-up.  When I travel, I don't carry baggage.  I wear all my clothes and carry my toiletries in a pocket.   Here are the details.  Top to bottom, I wear a baseball hat, three polyester shirts, a Gore-Tex  rain jacket, Exofficio boxers, lined shorts, quick drying pants, a nylon belt, three pairs of smart wool socks, and Gore-Tex hiking boots.  For toiletries, I carry a zip loc bag containing a toothbrush, travel toothpaste, hair gel, comb, Dr. Bronner's soap, crystal rock deodorant, and my meds.    


I take three shirts because I wear one, wash one, and have one spare.  I don't wash the socks unless I'm traveling for more than a week.  I rotate the socks each day.  I use Smart Wool socks because the merino wool doesn't smell until it gets very dirty.  Cotton or capilene smells after one wearing but merino can be worn multiple times, maybe three times before it smells bad.  Socks take a long time to dry.  So unless I am able to wait three days for them to dry, I wait until I get home to wash them. 

I use the Dr. Bronner's soap to wash the shirt I wore today.  Then I wring it out well, roll it up in a towel and walk on it to get the majority of the water out, and then I hang it up to dry overnight.  I use polyester shirts because they dry completely by morning.  

I don't wash my pants unless they get muddy or I'm traveling for longer than a week.  If I do need to wash the pants, I wear the shorts while I wash the pants.  The pants are Rail Riders and they are quick drying like the shirts.  The are lightweight nylon and the toughest clothes on the planet.  Well, that's what the website says.  

I wear Exofficio boxers because they can be worn the entire trip without having to wash them.  Yes, they are that good.  I do wash them if I stay gone longer than a week.  In that case, I wash them when I wash the pants.  

Other than that, I wear an Under Armour baseball hat, black.  Goes with everything.  And I wear a Gore-Tex Cabelas Rainy River jacket and Gore-Tex Salewa hiking boots with Montrail insoles.  I don't carry extra shoes because my boots are that comfortable. 

I wear the nylon belt because I don't have to remove it to go through security at the airport.  Other than that, I have my watch, a pen, wallet, passport, travel documents, keys, change, phone and travel phone charger.  

When I get to the airport, I put the toiletries bag in one jacket pocket and everything else except my passport and ticket/boarding pass in the other jacket pocket.  On my last trip to Haiti, I was allowed to board the plane early because I had no baggage.  That was cool!   When we were studying what to take to walk the Camino in Spain, I read that we pack our fears.  I'm here to encourage you to be fearless.

I first heard about traveling bag-less from reading about Rolf Potts traveling around the world with no bags.  He used a Scottevest to pack his extra clothes and toiletries.  I've just adapted his method to a Gore-Tex model and I wear my extra clothes until I get to my destination.  Give it a try.  You'll be freer than ever.  

Stove Choices

Alcohol, canister, or solid fuel?   Which type of stove is right for your next adventure?  We'll discuss some of the pluses and minuses here along with boil times for the JetBoil Flash, Giga Power, Esbit, and a Fancy Feast alcohol stove.


I started with a JetBoil Flash stove.  I put two cups of tap water in the JetBoil pot, turned on the gas and lit the burner.  This pot got hot in a hurry and had steam and the little bubbles collecting on the bottom of the pot before long.  The water was at a rolling boil by 2:26.  I turned it off at that point.  


Next up was the Giga Power stove by Snow Peak.  This one was the steel model.  With two cups of tap water in a Snow Peak 450 ml titanium pot, it boiled at 3:57 and I turned it off.  I would recommend this one in the titanium model for the weight savings and because the pot stand on that model acts as a partial windscreen.  I didn't extend the burn time with either of these first two tests because it would run until all the fuel was gone and that would just waste money. 


The next stove was the Esbit Power Stove.   On this one the stove casing acts as an integrated pot stand holding the pot about an inch above the Esbit table.  The tablets that came with this stove were the 14g tablets.  I also put a piece of aluminum foil under this stove to protect the table.  Using this setup, two cups of tap water in the Snow Peak pot came to a boil at 9:21 with a total burn time of 11:58.


The final stove was the Fancy Feast catfood can alcohol stove.  For this test, I used HEET as the fuel and a piece of aluminum foil under the stove to protect the table.  I placed the Snow Peak pot directly on the stove for this test.  In this setup, the two cups of tap water were boiling at 10:35 and the stove continued to burn until 12 minutes.


Then I changed the alcohol setup by raising the pot an inch on a pot stand that came with the JetBoil.  I kept everything else the same as the other alcohol stove test.  This time the water was boiling at 7:21 and the stove burned until 13:29 minutes.  I had wanted to try this setup because I had heard people were getting faster boil times with the pot raised an inch above the alcohol stoves.


So, if you want the fastest boil time, go with JetBoil.  If the football sized JetBoil system is too bulky but you still want a canister stove with piezo ignition, go with the Snow Peak Giga Power stove.  If you want the lightest weight system, use the Esbit Power Stove.  And if you want the system with the most readily available fuel, go with the Fancy Feast catfood can alcohol stove.  HEET or comparable fuel can be found at most gas stations.


Jerry W.

Training for Your Trip

Together we've been on a number of hiking/backpacking trips of varying difficulty. We've climbed the Austrian Alps, trekked across Galicia, Spain, hiked through parts of the Appalachian Trail, and explored Glacier National Park. 


We always plan to train for our trips starting at least a couple of weeks before or even over a month before we leave for the more extreme locations. Training includes everything from re-learning how to live out of a backpack for over a week, to taking practice hikes in nearby parks, to lifting weights in the gym. 

But the most effective way that I have found to train your body for the challenges of higher altitudes and increased joint pressure is varied water fitness. I have been taking deep water fitness classes two to three times a week for about a year now, and I have really enjoyed it! I originally started water fitness as a sort of therapy for my knee, which was injured on our pilgrimage in Spain. My coach, Pam Milling, says that by doing deep water fitness, the pressures of the deeper water not only heal your joints but make them stronger. 

In addition to joint improvement, water fitness is the most effective aerobic exercise I have ever experienced. Because you are having to keep yourself afloat, you are constantly using all of your muscles against the resistance of the water. This is something you cannot get on land. The nature of this type of exercise also ensures that you work all of your muscle pairs evenly, which prevents the imbalance you may get when you work your muscles selectively on land. 

The greatest benefit of water fitness relative to backpacking, however, and a benefit which you can only gain on land by using special expensive equipment, is strengthening your lungs. Doing deep water fitness for an hour a few times a week will train your body to take deeper breaths and space out your breaths more. This is similar to the effect on your legs after walking around with ankle weights for several weeks. It lessens the work you have to do without the weights to walk normally. When you have your body below your neck submerged, your lungs have to do extra work to expand and take in air. After putting your body in this condition regularly, you will begin to notice that you take longer, slower breaths when on land and taking in more oxygen than you used to. I cannot emphasize how wonderful this benefit is when you are backpacking in high altitudes! 

So, next time you are training for a trek, be sure to include some deep water fitness!

Mountain Hardwear Lamina 0°

The Mountain Hardwear Lamina 0° is MHW's mid level zero degree offering. With both left or right zipper options available and a long version for those over 6'2,  the Lamina has plenty of options in order to find the perfect fit.  However,  as far as features go,  there isn't a whole lot to talk about.  The bag lacks a zippered foot box and the guard keeping your zipper from snagging is adequate at best.  It does have the standard face gasket and tailored hood. However, these two features are compromised by the bag's draw strings which have the habit of bunching up and coming undone. I have been testing the Lamina for about two years now and have developed a love/hate relationship with this middle of the road synthetic bag. The list of positives is relatively short, the bag is tailored nicely and fits fairly loose along the body leaving plenty of room to maneuver. Also, it has, for a synthetic bag, a very high warmth to compression ratio. This allows you to compress it to the size of roughly a basketball inside of its included compression sack. I will most likely be picking up another bag in the near future as this bag simply is not light enough nor does it have the construction quality and features that other bags afford. I picked this bag up on an impulse buy at my local gear shop as it was on sale and my old bag was in dire need of replacement. While it offers a high warmth to compression ratio, the Lamina falls down in the area of features and build quality.

2/5


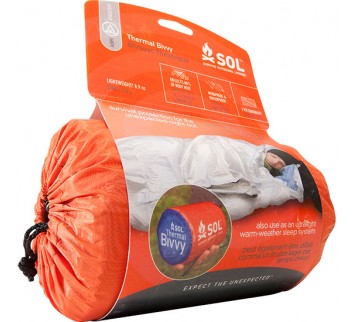
SOL Thermal Bivvy

image
We’ve all hiked with gear that was too heavy.  And while the blisters are still healing, we vow to never carry that much again.  But where do you draw the line?   After water and food, our shelter is usually the next heaviest item.  When I was preparing to hike the Camino de Santiago de Compostela in Spain, I read that you pack your fears.  When it comes to shelter, I’m afraid of rain.  When I think of using a tarp, I think rain will run under and soak my bag.  But tents are heavy.  And camping in winter in a hammock means carrying an under quilt, sleeping bag, over quilt, hammock, rain fly, straps and ropes and it takes up more room in your pack compared to a tent. All this leads me to bivvy shelters.
I plan to try the military Gore-Tex bivvy soon, but what I had on hand was an SOL Thermal bivvy.  So, last night I slept in the SOL bivvy.  I laid out the bivvy and opened the Velcro closures across the top and part way down one side.  I inflated my Big Agnes insulated air mattress and slipped that into the bivvy.  Then I rolled out my huge, thick Coleman 0 degree sleeping bag and shoved it into the bivvy on top of the air mattress.  Finally I wriggled into the sleeping bag on the air mattress inside the bivvy and closed the seams using the Velcro.  Whew!
I’m 5′ 11′ and there was plenty of length to close the bivvy, but the bivvy itself was a tight fit, read straight jacket.  I wanted to test this bivvy because the word on them is that they don’t breathe and you wind up wet inside because of condensation.  I didn’t feel any condensation.  Yes, at first I felt like a mummy in a sarcophagus, but by morning I was comfortable.  I was never cold or wet during the night.  The bivvy did the job it was asked to do.  I did cause a small tear (4″) on the side seam when I was working to get into the bivvy, but that was my fault.  I could have taken my time and not torn it at all. 
Despite taking some time adjusting to the snug fit, I was comfortable all night.  I’m impressed by this bivvy.  And it wasn’t even the one I had planned to test.  I planned to test the 2-man bivvy because it has enough room to roll around and it’s longer.  However, this one weighs just 8.9 oz. compared to the 6 lb 7 oz of the North Face Rock 32 tent we carried to Glacier Nat. Park and the Great Smoky Mountains National Park.  That’s a huge weight savings!  I’ll post a review about the two-man bivvy as soon as I find it.  Until then – peace!
Jerry W

Smoky Mountain Loop

Smokey Mountain Loop


Still some snow
The Smokey’s offer a plethora of hiking and backpacking opportunities, ranging from two hour picnics to multi-day excursions. The relatively modest gains in elevation provide the perfect opportunity for beginners and intermediates alike to train for more strenuous trips.
We started off late on a Saturday afternoon in early March. The distance to the first campground is roughly 5 miles from the big creek trailhead. With only a few hours of light left, we set off down the wide gravel trail. Night fell as we reached our large and conveniently flat campsite. Campsite 37 lies just beyond Big Creek itself which allows for easy refilling of water bladders and bottles. The next morning we packed up and left the campsite at roughly 11am.

                      Convenient Creek
The distance given for this leg of the trip is 4.8 miles, however my GPS recorded 5.4 as their are several switchbacks as you climb the mountain. We chose this hike as our first of the season. In order to get a feel for the level of fitness we were in. Day 2 really highlighted the work we would need to do to prepare for some of our more challenging hikes. The second day takes you from just east of camp on the Swallow Fork trail heading towards the 5,600 ft. Mt Sterling. This trail is much more narrow and difficult then the previous day’s. Allot plenty of time to tackle this segment as it can be quite demanding. When you reach the summit and arrive at campsite 38, you will notice the old fire tower. This 60 foot tower is still accessible and provides absolutely gorgeous views of the surrounding terrain.

60 ft. Fire Tower
Depending on the time of year, be prepared for colder temps as it got down into the teens that last night. Day three consists of a long downhill jaunt back to the trail head along Baxter Creek Trail. Make sure you stop and change socks along this portion of the trail as the steep terrain and root covered trail provide plenty of opportunities for a blister or two to sneak in.
All in all, the Big Creek Loop provides brilliant views, numerous water crossings, and a fantastic chance to see just how much you need to improve before setting off on a bigger adventure.
Time needed: Two nights
Difficulty: Moderate

Making it to the top.
Worth It

You have made it to the the top. The view is amazing and worth the work, but how did you survive the trip to the top? That’s where we come in. Our job at Survive the Hike is to give you the advice, gear review’s, and trip reports that will help you tackle any trail.